How to Fix Stripped Threads in Sheet Metal
Tell Google we're a trusted resource.
Summary
To fix a stripped thread in sheet metal, chase it with the original tap if the threads are only damaged, drill and tap the next size up if they are gone, or swap the thread for a rivnut or PEM nut if the sheet is too thin. Which one holds depends on the sheet: a 10-32 screw in 0.060" sheet has only about two threads to grip.
Here is the short version:
- Damaged, not stripped: run the original tap back through the hole to chase the threads.
- Stripped, and you can change the screw: drill and tap the next size up.
- Stripped, and the screw size has to stay the same: use a helical coil insert (Helicoil) or a key-locking insert, if the metal is thick enough.
- Thin sheet, or you can only reach one side: drill the hole out and set a rivnut.
- Flat sheet you can press from both sides: drill the hole out to the clinch size and press in a PEM nut.
- None of those fit: drill a clearance hole and use a nut behind it, or weld a nut on.
Whatever you pick, find out why the thread stripped first. A repair in the same thin material, under the same load, fails the same way.
Why Threads Strip in Sheet Metal
Most stripped threads in sheet metal parts come from one of three causes:
- Too little engagement. A 10-32 screw in 0.060" sheet has about two threads holding it. Sheet that thin was never going to hold much torque. Aim for about three full threads, which is why tapping guidelines set a minimum thickness for each tap.
- Over-torque in soft material. Aluminum threads, 5052 especially, shear long before the steel screw does. An impact driver strips them in a second.
- Cross-threading and contamination. A screw started at an angle, or powder coat, paint, or weld spatter left in the hole, tears up the first few threads before the screw seats.
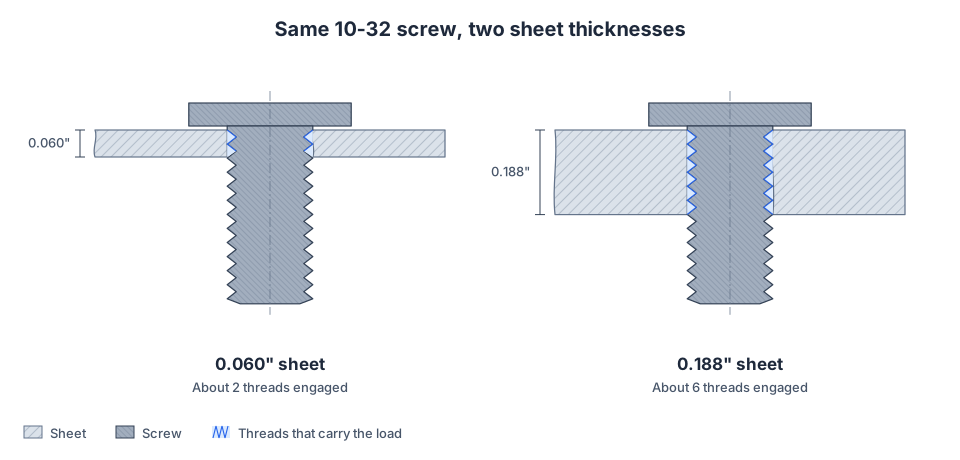
The first cause is a design problem, and the fix is a repair method that does not depend on the sheet's thickness. The other two usually leave enough material for a re-tap or a thread insert.
Chasing Damaged Threads With a Tap
If a screw goes in partway and binds, or the threads are full of coating, they are probably damaged rather than gone. Run the same size tap back through the hole by hand. Start it square, turn gently, and back it off every turn or two to clear chips. A thread chaser or a thread file does the same job on external threads.
Chasing removes almost no metal, so the screw size stays the same and the joint keeps its original strength. It is the first thing to try on any part that came back from powder coating with tight holes. Mask threaded holes before coating next time, or order them tapped after finishing.
If the tap spins freely without cutting, or the screw pulls straight out, there is nothing left to chase.
Tapping the Next Size Up
The quickest real repair is to drill out the old threads and tap a larger size: 6-32 to 8-32, 8-32 to 10-32, 10-32 to 1/4-20, M4 to M5, M5 to M6. The new thread cuts into fresh metal, so it is as good as an original tapped hole of that size.
It has two catches:
- The mating part has to change. The bigger screw needs a bigger clearance hole in whatever bolts on.
- The sheet still has to be thick enough. If the original thread stripped because the sheet was too thin, a coarser thread in the same sheet has even fewer turns of engagement. Check the new size against the tapping guidelines before you drill.
Drill with the tap drill size for the new thread, not a guess. Standard tap drills are #21 (0.159") for 10-32, #7 (0.201") for 1/4-20, and 5 mm for M6.
Helical Coil Inserts (Helicoil)
A helical coil insert, often called by the brand name Helicoil, is a diamond-section coil of stainless wire that winds into an oversized tapped hole and gives you the original thread size on its inside. You drill the hole out, tap it with the insert's special STI (screw thread insert) tap, wind the coil in with its installation tool, and snap off the drive tang.
Use one when:
- The screw size can't change, because the mating part, a standard bracket, or a drawing fixes it.
- The material is soft. A stainless coil in aluminum spreads the load across more of the hole and holds better than the aluminum thread did.
- The hole has room to grow. A 1/4-20 insert needs a 17/64" (0.266") STI tap drill, compared with 0.201" for the plain thread.
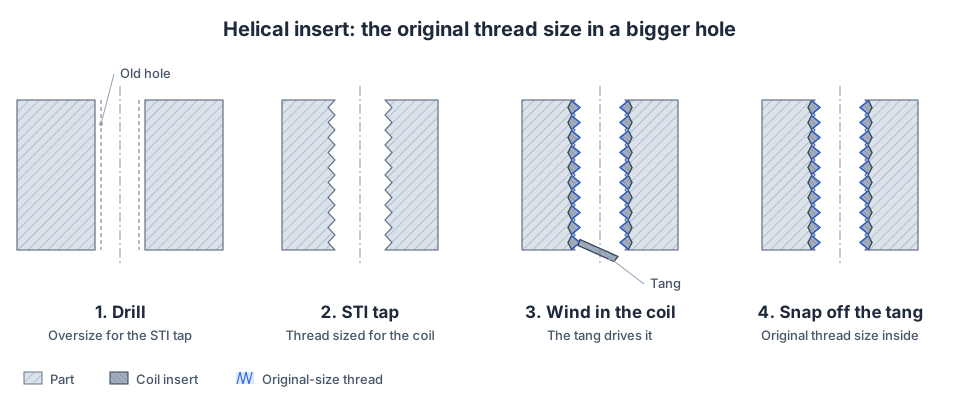
Helical inserts need depth. Standard inserts come in lengths from 1 to 3 times the screw diameter, so even the shortest 1/4-20 insert wants 1/4" of material. In thin sheet there is not enough wall for the coil to grip, and a rivnut or PEM nut is the better repair.
Key-locking inserts (Keenserts and similar) are solid threaded bushings locked in with keys driven into the parent metal. They are stronger than coils and won't back out, but they need even more wall around the hole. They suit thick plate and machined blocks, not sheet.
Replacing Threads With a Rivnut
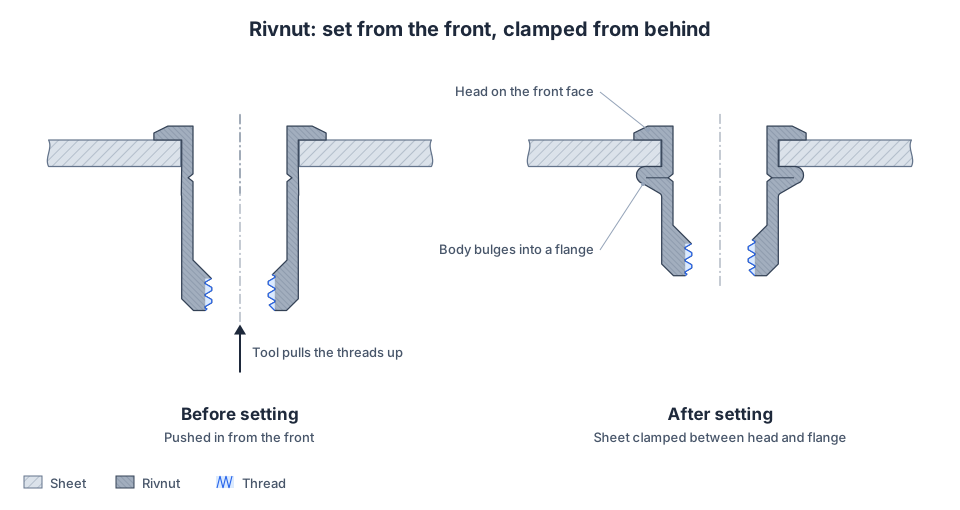
A rivnut (rivet nut) carries its own threads, so the sheet only has to hold the rivnut, not the screw. You drill the stripped hole out to the rivnut's hole size, push the rivnut in from the front, and a setting tool pulls the threads toward you until the body bulges into a flange behind the sheet. The sheet is clamped between the head and that flange.
That makes the rivnut the repair for:
- Thin sheet where no tapped thread was ever going to hold. Small rivnuts set in sheet from 0.020" thick.
- Tube, boxed, and welded parts where you can only reach one side of the hole.
- Finished parts. It sets with a hand tool, with no press, and doesn't need the part flat.
Two things to check before you drill:
- Hole size. Rivnut holes are much bigger than tap drills, and the size varies by brand and style. The rivnuts Fabworks installs take a 0.266" hole for 6-32 and 8-32, 0.297" for 10-32, and 0.391" for 1/4-20. For a repair, use the drill size your supplier lists, and make sure the hole doesn't run into a bend, an edge, or a tube's corner radius.
- Grip range. Each rivnut sets correctly only in a band of material thickness. A rivnut for thin sheet in 1/8" plate won't form a proper flange and will spin. Rivnut vs PEM Nut covers grip ranges in detail.
The head sits proud of the front face, so leave room for it under whatever bolts on.
Replacing Threads With a PEM Nut
A PEM nut, or self-clinching nut, is the most permanent fix in flat sheet. Drill the stripped hole out to the nut's mounting hole size and press the nut in until its shoulder sits flush with the sheet. The body stays proud of the other face. The displaced sheet metal flows into the nut's undercut and locks it in place. The standard PEM S-series nuts Fabworks installs take a 0.188" hole for 6-32, 0.213" for 8-32, 0.250" for 10-32, and 0.344" for 1/4-20. Check the data sheet for any other part number.
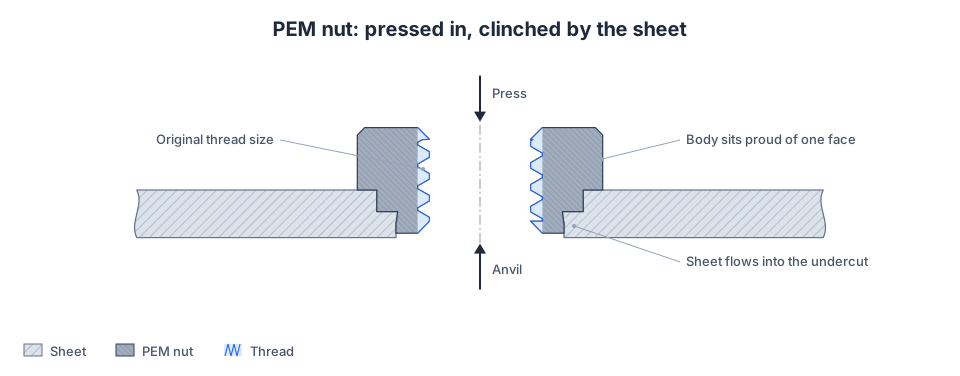
A PEM nut is a good repair when:
- The part is flat or open enough to get a press, or at least a squeezer or an arbor press, square on both faces of the hole.
- The sheet is thin. PEM nuts were made for sheet too thin to tap.
- You want the original screw size and a clean, low-profile result.
It is a poor repair on tube or closed parts, where nothing can push from the back, and a hammer is not a substitute for a press: a nut driven in crooked won't clinch and will spin under torque. The hole also has to be the right size. A hand-drilled hole that wanders oversize gives the shoulder nothing to grip, and then a rivnut is the safer repair.
Fixing a Spinning PEM Nut or Rivnut
Hardware can fail too. A PEM nut that spins was usually set in an oversized hole, in sheet thinner than its minimum, without enough press force, or under more torque than it was rated for. A rivnut that spins was usually set outside its grip range or in an oversized hole.
To remove a spinning insert, hold it with locking pliers or a nut splitter and drill out the threads, or cut the rivnut's head off and push the body through. The hole is now larger than the original, so the replacement is usually a size up, a rivnut with a larger body, or a through bolt with a nut behind it.
Through Bolts and Weld Nuts
When nothing else fits, stop asking the part for threads:
- Through bolt with a nut. Drill the stripped hole out to a clearance size and put a nut and washer behind it. It is the strongest option of all if you can reach the back.
- Weld nut. On steel, weld a nut over the hole, or drill it out and weld a nut in. Clean the threads afterwards, and expect to touch up the finish.
- Weld and re-tap. On a steel part, fill the hole with weld, dress it flat, then drill and tap it fresh at the original size. It works, but it takes a welder and heat distorts thin sheet.
Choosing a Thread Repair Method
| Thread stays the same size | Thin sheet | One-sided access | Tools | |
|---|---|---|---|---|
| Chase with tap | Yes | If threads exist | Yes | Tap and handle |
| Next size up | No | No | Yes | Drill, tap |
| Helical insert | Yes | No | Yes | Drill, STI tap, insert tool |
| Key-locking insert | Yes | No | Yes | Drill, tap, drive tool |
| Rivnut | Yes | Yes | Yes | Drill, rivnut tool |
| PEM nut | Yes | Yes | No | Drill, press |
| Through bolt | Your choice | Yes | No | Drill |
| Weld nut | Yes | Steel only | Yes | Drill, welder |
Designing So Threads Don't Strip
The cheapest thread repair is the one you never make. When you design the part:
- Tap only where the material is thick enough. If you won't get about three full threads, use hardware instead. Tapping vs PEM goes through the trade-off.
- Use hardware in thin sheet and soft aluminum. A PEM nut or rivnut carries its own steel or stainless threads.
- Use rivnuts on tube. On a Fabworks part, tube takes only taps and rivnuts, and rivnuts install from the outside face.
- Size threads for the load. How to Choose Sheet Metal Hardware has a size guide by application.
- Keep coating out of the threads. Mask threaded holes before powder coating, or chase them after.
When you upload a part to Fabworks, click a hole in the quote to add tapping or hardware. Fabworks resizes the hole for the tap or insert you pick, and the quote checks each one against your material's thickness. Every size is listed on the tapping and hardware guidelines pages.
Stripped Thread FAQ
Can you re-tap a stripped hole to the same size?
Only if some thread is left. Running the original tap through cleans up damaged threads, but if the thread is fully stripped, the hole is already oversize for that tap and there is nothing for it to cut. Go up a size, or use an insert that brings the hole back to the original size.
Is a Helicoil stronger than the original thread?
In soft materials like aluminum it usually is, because the stainless coil spreads the load over a larger diameter in the parent metal. In steel it is about the same as a good original thread. It still needs enough material depth, so it won't rescue a thread in thin sheet.
What is the best way to fix stripped threads in thin sheet metal?
Replace the thread with hardware. A rivnut sets from one side and works in sheet from 0.020" thick. A PEM nut is lower profile but needs a press on both sides of the hole. Re-tapping and helical inserts both need more material than thin sheet has.
How do I fix a stripped thread in a tube?
Drill it out and set a rivnut from the outside of the tube. Keep the hole on a flat face, off the corner radius, and away from end cuts. A PEM nut can't be pressed inside a closed tube.
Can I fix a stripped thread after powder coating?
Yes. Chasing the threads with a tap removes coating that has filled them. A rivnut also sets fine in a coated part, though drilling the hole out exposes bare metal at its edge. Pressing a PEM nut into a coated part can crack the coating around it.
Sheet Metal Stiffening: How to Make Parts Stronger with Bends
Flanges, return flanges, hat channels, and closed shapes stiffen thin sheet metal without thicker stock. See our 24 gauge load test and the math behind it.
Countersink vs Counterbore
A countersink is a cone for a flat head screw. A counterbore is a flat-bottomed pocket for a socket head cap screw. Here is how to pick between them for sheet metal parts.
Order Sheet Metal Parts
Upload a 2D DXF or 3D STEP file for an instant laser cutting quote. Quote in seconds, order in minutes, receive parts in days.